In a dynamic environment, servers are created and destroyed all the time. When a new server comes to life, depending on its purpose, you might need to update configuration files from other servers to tell how to access it. A simple example would be updating your load balancer configuration by adding a new webserver or removing a webserver that was destroyed.
This article will demonstrate how to achieve this with ansible and AWS - using dynamic inventory. Updating a haproxy load balancer with information of webservers (EC2 hosts).
Setup Dynamic Inventory
The setup will require a dynamic inventory to retrieve information about EC2 hosts.
If you haven’t setup already, take your time and check Ansible documentation on this subject. Also check my post where I describe how to use static and dynamic inventories together.
To test you can run ./ec2.py and should see a json with all your EC2 infrastructure there.
Identifying Instances
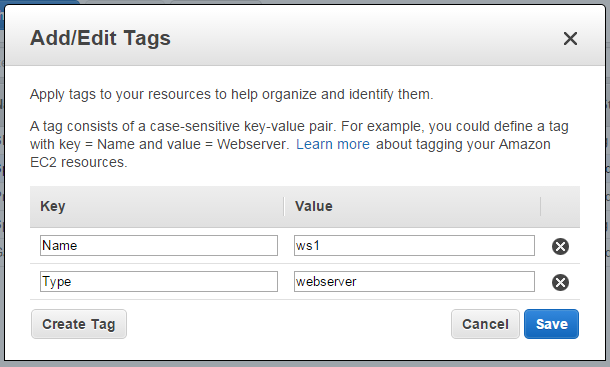
To identify which EC2 hosts are going to be automatically added to haproxy, let’s use EC2 tagging. Add a tag to your webservers called: Type = webserver

Ansible EC2 dynamic inventory (ec2.py) automatically creates groups for each EC2 tag. So in the example above, your servers will be available in a group called tag_Type_webserver.
HAproxy configuration
Now we need a role which will deploy /etc/haproxy/haproxy.cfg
Role is composed by 2 files:
roles/haproxy/tasks/main.yml:
---
 - template: src=haproxy.cfg.j2 dest=/etc/haproxy/haproxy.cfg
roles/haproxy/templates/haproxy.cfg.j2:
global
    log 127.0.0.1 local0 notice
    maxconn 2000
    user haproxy
    group haproxy
defaults
    log     global
    mode    http
    option  httplog
    option  dontlognull
    retries 3
    option redispatch
    timeout connect  5000
    timeout client  10000
    timeout server  10000
listen appname 0.0.0.0:80
    mode http
    balance roundrobin
    option httpclose
    option forwardfor
    {% for item in groups['tag_Type_webserver'] %}
    server {{hostvars[item].ec2_tag_Name}} {{hostvars[item].ec2_ip_address}}:80 check
    {% endfor %}
Note the section with {% for item in groups[‘tag_Type_webserver’] %} that will loop through the group of servers with Type=webserver EC2 tag before and write the configuration file with each server found as a entry at haproxy.cfg.
Wrapping Up
Now you need a playbook to run the haproxy role, a simple example would be:
---
 - hosts: tag_Type_loadbalancer
   roles:
    - haproxy
tag_Type_loadbalance will apply this playbook on EC2 hosts with the tag Type = loadbalancer, making it easier than having to maintain an inventory file with fixed IP addresses of your servers on it.

